In this tutorial you will learn:
FlowModeler provides its own scripting language called flowScript. flowScript is a simple language that can control FlowModeler. The main purposes of scripting are:
Scripts can be saved in text files with the *.flowScript extension. The language uses a descriptive syntax so it is easy understandable by users with a non-programming background.
The language offers all elements of a programming language. Here we will only give a brief introduction to them, but cover them in more detail in the next tutorials.
The flowScript language provides basic data types for Boolean, Integer, Real, String and Object values. These can also be combined into Arrays. The language offers automatic type conversions between the base types.
Mathematical and logical operations are evaluated with a predefined precedence so complex expressions can be evaluated.
Branch and loop statements allow to control and repeat specific part of a script. Functions allow to define reusable sections.
Scripts can be split up into multiple files or even script libraries.
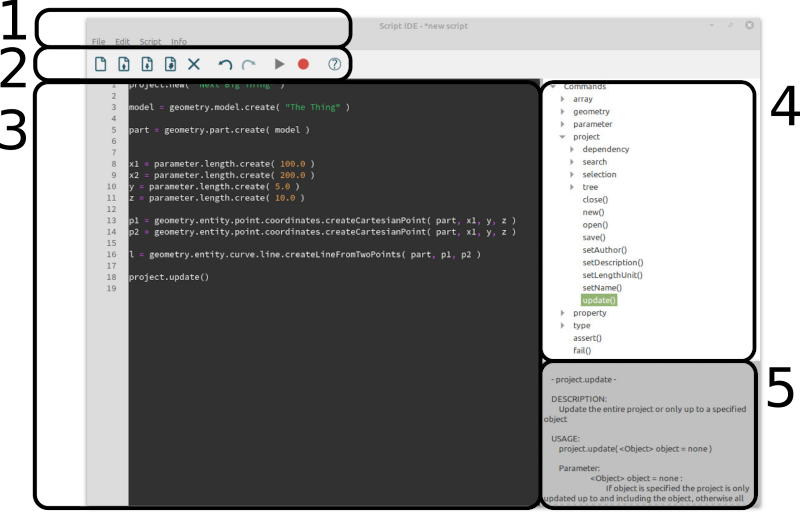
FlowModeler provides a Script-IDE (Integrated Development Environment) for flowScript. The IDE can be accessed throught the Menubar with Tools/Script-IDE.
In the tradition of other programming languages we will now create a first script that print the famous words "Hello World!".
If you haven't already please start FlowModeler and open the Script-IDE.
In the Text-Editor type the following line of code
greeting = "Hello World!"
With this line we have created a new variable named greeting and assigned the string value Hello World! to it
Now place the cursor in the next line and navigate in the Browser to Commands/print().
Select the print() entry in the Browser and the Help will display the information for the command. At the top of the help the DESCRIPTION states the following: Prints the specified text, which may be defined as error. Below of that the USAGE gives the following information: print( <String> text, <Boolean> is_error = false ) shows how the command is to be used in a script. The command accepts two arguments a String that will be displayed and a Boolean that indicates how the message is to be displayed. You can see further that the is_error argument has a default value set to false which means that the argument is optional and needs not to be specified when calling this command.
Double-Click the print() item in the Browser. The Text-Editor now has a print() command added to it. All we need to do now is to set the greeting variable we defined earlier as text argument in the print() command. The line should look like the following:
print( greeting )
The next thing we have to do is to save the script to a file. This can be done either with File/Save in the Menubar or with the Save-Button in the Toolbar.
After the script has been saved it can be executed. This can be done either by Script/Play in the Menubar or the Play-Button in the Toolbar. Then a console window will open and show the following:
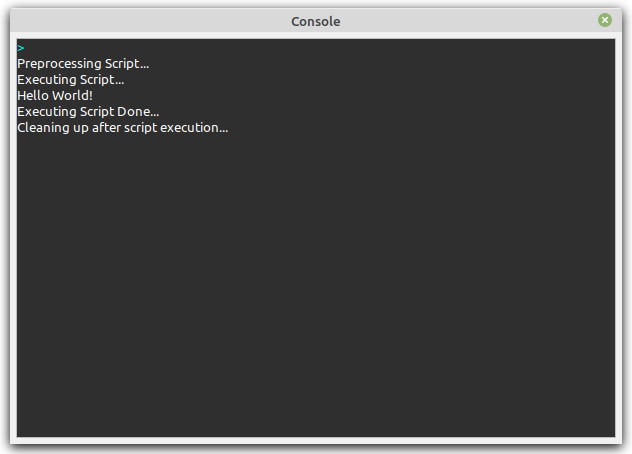
Here you can see the steps FlowModeler does when executing scripts:
During the Execution step our script does what we expected from it: print the Hello World! text. If you like you can modify the print command in line 2 to print the text formatted as error:
print( greeting, true )
Save the file and execute it again.
Scripts can not only be created by hand but also recorded from a session. You may already have noticed the Record-Button in the Toolbar and Script/Record in the Menubar.
To record commands from a session please create a new script with File/New or the New-Button in the Toolbar.
Now enable the script recording.
Go back to the main FlowModeler window and crate a new Project.
In the Project for example open the Geometry-Menu and choose Points/Coordinates/Cartesian and set the X-, Y- and Z-Dimensions to 100, 200 and 300 respectively. Submit the dialog with OK.
Now go back to the Script-IDE and deactivate the Recording and have a look at the recorded commands.
First the Project was created along with Model.1, the AxisSystem in the Reference Part and the empty Part.1. Model.1 and Part.1 were define active and the Project updated:
project.new("New Project", "", "", "mm")
geometry.model.create("Model.1")
geometry.model.defineActive(project.search.findOneObjectByName("Model.1"))
geometry.part.create(project.search.findOneObjectByName("Model.1"), "Reference")
geometry.part.defineActive(project.search.findOneObjectByName("Reference"))
geometry.entity.reference.axissystem.createAxissystemFromDirections(project.search.findOneObjectByName("Reference"), none, none, none, none, "AxisSystem.1")
geometry.part.create(project.search.findOneObjectByName("Model.1"), "Part.1")
geometry.part.defineActive(project.search.findOneObjectByName("Part.1"))
project.update()
Then the Length parameter dimension were created and set as the point's X-, Y- and Z-Dimensions.
parameter.length.create(0, "Length.1")
parameter.length.create(0, "Length.2")
parameter.length.create(0, "Length.3")

geometry.entity.point.coordinates.createCartesianPoint(project.search.findOneObjectByName("Part.1"), project.search.findOneObjectByName("Length.1"), project.search.findOneObjectByName("Length.2"), project.search.findOneObjectByName("Length.3"), none, "PointXYZ.1")
Then we modified the values of the parameter to be 100, 200 and 300 respectively.
parameter.length.setValue(project.search.findOneObjectByName("Length.1"), 100)
parameter.length.setValue(project.search.findOneObjectByName("Length.2"), 200)
parameter.length.setValue(project.search.findOneObjectByName("Length.3"), 300)
You can now save the script to a file, close the Project in the main window and execute the script which should recreate the session we recorded.
As you can see in the above code: the recorded script may not be very efficient. Objects are created in one line and then searched for in the FlowModeler object database in the subsequent lines (e.g. with project.search.findOneObjectByName). If you check out the create commands in the Browser and look at the provided help you can see that those commands return the created object. This means that we can assign the returned object to a variable and use this variable instead of searching for it everytime. The improved code now looks like this:
project.new("New Project", "", "", "mm")

model = geometry.model.create("Model.1")
geometry.model.defineActive(model)

reference_part = geometry.part.create(model, "Reference")
geometry.part.defineActive( reference_part  )
geometry.entity.reference.axissystem.createAxissystemFromDirections(reference_part, none, none, none, none, "AxisSystem.1")
part = geometry.part.create(model, "Part.1")
geometry.part.defineActive(part)
project.update()

l1 = parameter.length.create(0, "Length.1")
l2 = parameter.length.create(0, "Length.2")
l3 = parameter.length.create(0, "Length.3")

point = geometry.entity.point.coordinates.createCartesianPoint(part, l2, l2, l3, none, "PointXYZ.1")

parameter.length.setValue(l1, 100)
parameter.length.setValue(l2, 200)
parameter.length.setValue(l3, 300)
Further more it does not make sense to create the parameter with a value of 0 then create the point and set the values of the parameter afterwards again. We can futher optimize if we specify the desired values while creating the parameter directly. Also the project.update() command makes much more sense at the end of the script. The final optimized script now look like this:
project.new("New Project", "", "", "mm")

model = geometry.model.create("Model.1")
geometry.model.defineActive(model)

reference_part = geometry.part.create(model, "Reference")
geometry.part.defineActive( reference_part  )
geometry.entity.reference.axissystem.createAxissystemFromDirections(reference_part, none, none, none, none, "AxisSystem.1")
part = geometry.part.create(model, "Part.1")
geometry.part.defineActive(part)

l1 = parameter.length.create(100, "Length.1")
l2 = parameter.length.create(200, "Length.2")
l3 = parameter.length.create(300, "Length.3")

point = geometry.entity.point.coordinates.createCartesianPoint(part, l2, l2, l3, none, "PointXYZ.1")

project.update()
So keep in mind that recorded scripts should be optimized for efficiency.
Through flowScript FlowModeler can to be used as a non-interactive tool and perform automated tasks without the graphical-userinterface (GUI) as well. In order to use the script from above non-interactive we add the following to the script:
The command to save the current Project can be found in Commands/project/save() in the Browser. Add it to the end of the script and specify the path for the flowProject file
project.save("path/to/myProject.flowProject")
The specified path may be an absolute path on the current machine, a relative path to the current working directory or just a filename which will save the flowProject in the current working directory.
Then add quit() as last command to the script
quit()
This is important otherwise FlowModeler would just continue and wait for further inputs and this would not work in non-interactive environments.
Save the script and then open a terminal window in the directory where you saved your script. To start FlowModeler non-interactive type the following command in the terminal:
flowmodeler --no-gui --script=MyScript.flowScript
Replace the MyScript.flowScript with the actual filename that you specified when saving the script.
Scripts are a very powerful way to automate tasks. They can be used during interactive sessions or make FlowModeler work non-interactively.
Read more about the flowScript Language in the next tutorials or for a complete reference refer to Overview for the flowScript Scripting-Language in the Usermanual.
Downloads